
Technical Reference – Static Objects
Tacview will automatically load and display any object declared in any .kml file stored in the sub-folders of your choice under: %ProgramData%\Tacview\Data\Static Objects\ or %APPDATA%\Tacview\Data\Static Objects\
Overview
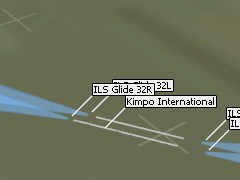
Static objects can considerably improve debriefings by outlining conflict areas, tactical ranges, interdiction zones, ILS, cities... It is also a powerful tool to validate trainees' progression: Now you can visually check if each plane trajectory follows the defined flight plan and ILS glides drawn as transparent 3D objects!
Adding static objects to Tacview world require very little technical knowledge. All you need to understand is the XML format and how to geographically localize objects on Earth. Since Tacview is working with a spherical world, you may have to manually convert flat terrain coordinates into real-life latitude and longitude if your favorite flight simulator is working in a flat world. Note that native support for Falcon 4.0 flat coordinates system is planned for a future release.
Keep in mind that static objects are purely visual for now. Battlefield units cannot interact with them. For example, it is not possible to destroy a static object. Also, only basic shapes are supported. Support for complex 3D objects is planned for a later release of Tacview. Because of constant tweaking and optimizations, objects colors may vary in future releases of Tacview. However, their shape will remain the same.
General questions
A: Of course! Here is a sample of airport and runway declaration. You can notice that each .xml file can contains as many objects declarations as you want. For each object, you usually have to specify the Type, Position (in any metric format), and Size (in meters). Additional attributes can be used to assign a Name, Shape, Color, or ID depending on the object type. The ShortName is going to be used to declutter the 3D view when the object is far from the observer.
- IT-BMS-Airports.xmlRelease Date: Thu, 19 Mar 2015File Size: 214.4 KB
<?xml version="1.0" encoding="utf-8" standalone="yes"?>
<Objects MapID="Falcon 4,Falcon 4.BMS">
	<!-- Tel-Nof, Israel -->
	<Object ID="ICAO:LLEK">
		<Type>Airport</Type>
		<Name>Tel-Nof AFB</Name>
		<ShortName>Tel-Nof</ShortName>
		<Position>
			<Latitude>31°46'52.30"N</Latitude>
			<Longitude>34°44'55.78"E</Longitude>
			<Altitude>57</Altitude>
		</Position>
	</Object>
	<!-- RWYs -->
	<Object>
		<Position>
			<Latitude>31°47'36.28"N</Latitude>
			<Longitude>34°45'2.55"E</Longitude>
			<Altitude>57</Altitude>
		</Position>
		<Shape>Cube</Shape>
		<Color>#2d94ff</Color>
		<Size>
			<Width>80</Width>
			<Length>650</Length>
			<Height>2</Height>
		</Size>
		<Orientation>
			<Yaw>359.7</Yaw>
		</Orientation>
	</Object>
</Objects>A: You can create and edit XML files with any raw text editor. For example, I would suggest the excellent Notepad++, but you can very well use the Notepad from Microsoft. What matters, it to save your file in the UTF-8 text format so Tacview can properly interpret and display objects labels in any language.

A: Tacview will automatically load and display any object declared in any .xml file stored in the sub-folders of your choice under: %ProgramData%\Tacview\Data\Static Objects\ or %APPDATA%\Tacview\Data\Static Objects\
A: As you can see in the previous example, there are two important points when add an airport in Tacview' world. First, you have to declare an object of the type <type>Airport</type>. This object is going to be used both to display a label in the 3D world and to detect take-off and landings events. The other type of object required is an almost flat cube <shape>Cube</shape> which is going to be used to represent the runway. You can obviously declare as many runways as you want. You can also use other types like Pyramid or Cone to display ILS glides.
Objects Syntax
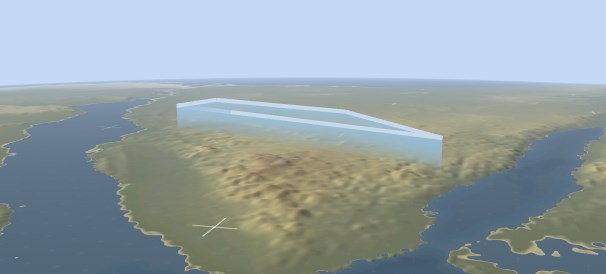
A: You can outline areas by using Border objects. Specify the outline Height and Colors, then list each Point around the area. Don't forget to repeat the first point in last if you want a closed outline.
<?xml version="1.0" encoding="utf-8" standalone="yes"?>
<Objects>
	<Border>
		<Color>#8db6cd</Color>
		<Height>10000</Height>
		<Point>
			<Position>
				<Latitude>28.86473</Latitude>
				<Longitude>33.6178</Longitude>
				<Altitude>0</Altitude>
			</Position>
		</Point>
		<Point>
			<Position>
				<Latitude>28.97212</Latitude>
				<Longitude>33.33071</Longitude>
				<Altitude>0</Altitude>
			</Position>
		</Point>
	</Border>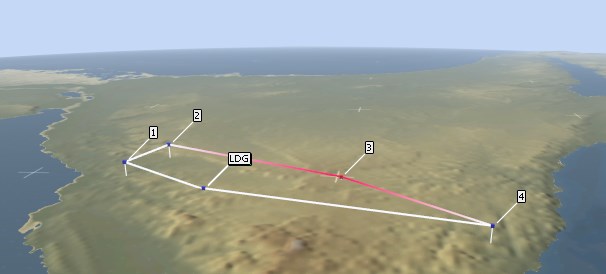
</Objects>A: Of course! It is very easy to display waypoints by using the Waypoints object which is a list of Waypoint. Each waypoint can have a distinct Name and ShortName. It is also possible to specify <Type>Strike</Type> to highlight specific combat waypoints.
<?xml version="1.0" encoding="utf-8" standalone="yes"?>
<Objects>
	<Waypoints>
		<Waypoint>
			<Name>Takeoff</Name>
			<ShortName>TKO</ShortName>
			<Position>
				<Latitude>28.86473</Latitude>
				<Longitude>33.6178</Longitude>
				<Altitude>900</Altitude>
			</Position>
		</Waypoint>
		<Waypoint>
			<Name>3 - CAS</Name>
			<ShortName>3</ShortName>
			<Type>Strike</Type>
			<Position>
				<Latitude>28.97901</Latitude>
				<Longitude>34.01542</Longitude>
				<Altitude>2000</Altitude>
			</Position>
		</Waypoint>
		<Waypoint>
			<Name>4 - Nav</Name>
			<ShortName>4</ShortName>
			<Position>
				<Latitude>28.58464</Latitude>
				<Longitude>34.41444</Longitude>
				<Altitude>5000</Altitude>
			</Position>
		</Waypoint>
	</Waypoints>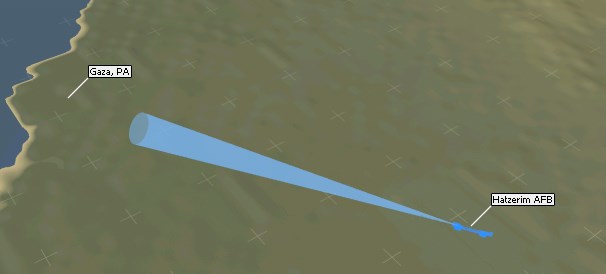
</Objects>A: You can create static Object of the following Shape:
- None (displays only the label)
- Cube
- Sphere
- Dome (half sphere)
- Tube
- Cone
- Pyramid
For each object, you can specify the Orientation (Roll, Pitch, and Yaw). For some asymmetric objects like Tube and Pyramid, you can specify the BaseSize containing a Width and Height.
<?xml version="1.0" encoding="utf-8" standalone="yes"?>
<Objects>
	<!-- Hatzerim AFB, Israel -->
	<!-- RWYs -->
	<Object>
		<Name>RWY 14L</Name>
		<ShortName></ShortName>
		<Position>
			<Latitude>31°14'41.95"N</Latitude>
			<Longitude>34°37'2.07"E</Longitude>
			<Altitude>183</Altitude>
		</Position>
		<Shape>Cube</Shape>
		<Color>#2d94ff</Color>
		<Size>
			<Width>80</Width>
			<Length>100</Length>
			<Height>2</Height>
		</Size>
		<Orientation>
			<Yaw>328.2</Yaw>
		</Orientation>
	</Object>
	<!-- ILS 14L -->
	<Object>
		<Name>ILS 14L</Name>
		<ShortName></ShortName>
		<Shape>Cone</Shape>
		<Color>#79BBFF80</Color>
		<Position>
			<Latitude>31°14'36.79"N</Latitude>
			<Longitude>34°37'5.82"E</Longitude>
			<Altitude>183</Altitude>
		</Position>
		<Orientation>
			<Roll>0</Roll>
			<Pitch>3</Pitch>
			<Yaw>328.2</Yaw>
		</Orientation>
		<Size>
			<Width>2500</Width>
			<Length>25000</Length>
			<Height>2500</Height>
		</Size>
		<BaseSize>
			<Width>20</Width>
			<Height>20</Height>
		</BaseSize>
	</Object>
</Objects>